Friday 19 December 2014

Need a tarp?


Hello, I’m initially breaking radio silence in blog world with a well deserved kit recommendation in the last few days before Christmas! However, keep an eye on this blog as I’ll be updating it regularly over the winter months with articles for anyone interested in traditional skills, crafts, kit advice, bushcraft skills and other adventures. I’ll be kicking things off with a series on making your own outdoor gear from scratch.

In the meantime...if you’re looking to make the transition from tent to tarp in 2015 or possibly hoping to swap your existing tarp for a lighter, stronger version…you must take a look at the Rig range from Alpkit. I have a LOT of time for this UK outdoor gear company, they just seem to keep getting better and better, coming up with new ideas and consistently producing  lightweight kit and clothing of high quality. Tarps are one item from their extensive equipment range that really don’t seem particularly complicated or confusing but don’t forget, you’re effectively investing in a roof over your head! Not a decision to be taken lightly…
 
The rig 7 tarp in action keeping the winter weather off me and my incredibly cosy bed!
 
 I’ve been using tarps (or ‘bashas’) all year, every year for several decades now, initially starting with the issue green army poncho in the mid 80’s (not very roomy or lightweight but fairly bomb proof) then progressing onto different sizes, materials, coatings, colours, even making several of my own. I love the simplicity and versatility of the concept and much prefer sleeping outside (but under cover) than crammed into a tiny, sweaty tent. The Alpkit Rig range first caught my eye due to the lightweight pack size compared to their generous coverage when open. The ‘kelp’ choice of colour was perfect for keeping a low profile in the woods too – a mute, non-offensive earthy colour without looking military in anyway. I initially went for the rig 7 as an extremely roomy one person option but was so impressed with it that the much larger rig 21 expedition tarp and super tiny, packable rig 3.5 soon followed.

The big rig 21 suspended from intermediate rigging loops to allow the ends to be folded in and make a fully enclosed and still very big tented area
 
This was my home for a very rainy mid summer ten day camp. Myself and all the course demo kit lived under here quite comfortably

 If you decide to try one, you’ll immediately notice the small pack size. Once open you’ll like the reinforced guy line holes and webbing tabs providing the perfect compromise between lightweight materials and strength. I’ve only ever seen one webbing loop break so far but the reinforced holes have never torn out or ripped on me yet. As you’re putting it up for the first time you’ll be impressed with the build quality, taped seams and neat, strong stitching. As you lay under it in your sleeping bag, listening to the rain drumming on your rig roof you’ll be amazed to see no leaks and astounded to see no absorption of moisture on the outside, just rain being repelled back to from whence it came (or into a collection device if you’re crafty).
 

Close up of reinforced guying holes. These are extremely strong even with very thin guy lines shown

The ridge line hanging loops, also reinforced and well sealed


In fact, one problem often associated with lightweight tarps and shelters is that of moisture transmission as soon as you touch the inside of the material. This just doesn’t seem to happen with the rig tarps (must get around to asking them why…). In North Wales recently I had to set up an extremely low bivvy due to high winds and was constantly brushing against the inside of my rig 7 tarp as I moved around inside but didn’t notice any drips coming through as a result. Result!!
Very low rig 7 bivvy tarp in North Wales. I'm lying in a ditch to give me a bit more room inside. Luckily the ditch had an underground drainage system...

My trusty rig 7 again doing a grand job of keeping off the winter snows. This roof pitch looks flatter than it was (the centre was raised to give a secondary pitch), even so the tarp didn't drip inside!
 
I’ve used the rig 7 as my main camping tarp for several years now and hope to for years to come. It’s the perfect size when open and packed away, strong, simple and light. There’s just no need to look elsewhere! The larger rig 21 has been used as a group shelter on courses, the inner skin on a leaky roundhouse when using it as a base camp in foul conditions and even the roof of a show stand at outdoor events (unfortunately it was nicked recently so I’ll be ordering another one next year).

The massive rig 21 deployed as the roof of our show stand at the wilderness gathering 2013. The tarp easily kept the whole of our extensive display dry and when packed down, takes up around half the volume of the little round willow basket in the fore ground!


The rig 3.5 is a little revelation. It’s a minimalist one person bivvy tarp with all the same features as it’s larger cousins. It’s main advantage is that it packs down absolutely tiny. I mean minuscule!  This makes it perfect for super lightweight, minimalist trips, adventure races and especially as a ‘you never know’ bit of kit in your daypack. I use mine as exactly that and it gets frequently set up as a temporary work area when I’m out in the woods working on a craft of small project on a rainy day. Barely noticeable in your pack, easy to set up and provides a decent dry spot for one person, whittling a spoon by the fire.
The amazing rig 3.5 set up as overhead shelter for a one person temporary workshop area

The same rig 3.5 tarp set up as a good sized, one person survival shelter, open fronted to allow the occupant to stay warm next to the fire (otherwise the open front could be closed down for maximum weather protection and retained warmth as shown below - one corner flipped up to provide a sheltered cooking area during the day)


The 3.5 rig tarp packed away, sitting in between Nalgene bottle/ titanium mug combo on the right and insulated jacket in yellow dry bag on the left. This standard day kit has everything needed for a walk off the beaten track plus emergency overnight gear. The rig 3.5 compliments this small, lightweight but effective set up perfectly
 
Take a look at some of my images of my rig tarp collection in use and if you’re after a tarp, I can heartily recommend the Alpkit rig range. Check out all the specs here
Happy winter tarping!


Thursday 6 March 2014

Primitive Packs – load carrying equipment made from sticks, skins and string:


This post was originally published in a magazine but after spending the weekend weaving perfectly useable kit carrying devices using only willow wands and rushes, I thought it deserved an airing!

When I first started down this route over twenty five years ago, it was with a view to learning the essential survival skills that might give me the edge in an unplanned outdoor emergency but I never really devoted a lot of thought to where I was heading and why. Over the years my direction has seemingly changed from ‘survival training’ leaning more towards the traditional crafts and wilderness living skills collectively known today as ‘bushcraft’ although the effortless merging from one into the other implies that this had been my intended journey all along. I was just addressing it by the wrong name!

 Bushcraft as a subject is difficult to define having many variables and countless connotations, meaning different things to different people.  An interest in bushcraft often begins with survival training then delves further, looking towards becoming able to source everything needed for life from the natural world around us. We strive to learn how these natural resources were shaped and processed to benefit our lives in days gone by. With the development of this knowledge comes an awareness of how resources should be harvested responsibly so as not to have a lasting impact on the very environment that provides us with everything we need. One thing’s for certain…bushcrafters will never be bored!

Those of us who like to trace a skill back to it’s roots in order to understand it completely, look to the sketchy clues of the past for inspiration. More recent, well documented hunter gatherer societies help to fill in the gaps but every now and again a window to the past is unearthed enabling us to see first-hand, how ancient people, not too different from us today, were able to live in relative comfort long before we all needed bushcraft knives costing more than a family car and branded waterproof coats flown into the UK from the other side of the world.

One such window discovered in the Otztal Alps, September 1991 was Otzi,  the ice mummy found still surrounded by a good amount of his personal possessions just over 5,000 years after perishing in the snow. Setting aside the mysterious circumstances of his demise for now, the fact that he was moving through such treacherous terrain meant that he must’ve had total confidence in his clothing and gear to even consider it as a realistic option. No goretex covered, down filled jacket for this chap! Instead, his outfit had been skilfully made up from grasses, animal hides, bark, stone, sinews and wood.  Everything he carried and wore had been crafted from the woods, rivers, mountains and meadows he had lived amongst all his life. So based on this evidence and other similar examples, a motivated and skilled bushcrafter could theoretically put together a whole outfit, proving that everything a person needs really can be found in or made entirely from natural resources.  That’s quite a challenge! We’ll need something to carry it all in…

 Otzi’s pack frame:

 Otzi had what most people think was a pack frame lying near him. If so, then this item alone illustrates perfectly, the combining of skills and knowledge that a bushcrafter strives for. A two metre bent hoop of hazel rod formed the frame itself so the maker must have known about hazel as one of the more flexible woods. Two backboards of larch were lashed securely to this using plant fibre cordage meaning that the maker knew which species provided strong cordage and also how to process and construct the cordage needed. A goatskin kit bag was believed to have been fastened to the frame so a working knowledge of how to preserve and cure animal hides in order to make leather and buckskin would have been needed. I don’t believe any shoulder straps were found but these must’ve been present originally and it would be fair to assume these were also leather of some sort.  The images of the broken frame, despite being extremely ancient remind me hugely of some modern day external frame packs I have lugged over hill and dale so it doesn’t seem beyond comprehension that I might be able to make up a close copy that might actually be effective and maybe even comfortable to carry. After all, Otzi did apparently haul his original model most of the way up a snowy mountain with an arrow head lodged deep in his shoulder! You can’t really get a better recommendation than that.
Construction:
My first job was to cut and bend a two metre length of hazel wood. Having had some success with steaming and bending wood in the past I decided to give it a whirl by suspending the hazel rod over a steaming pot of water, covering both rod and pot with a damp towel. The rod was quite thick and the bend in the middle, pretty tight so my first couple of steaming attempts resulted in splintered hazel. ‘Let’s keep this simple’ I thought so I decided to gently coax the freshly cut section by hand, around a stump acting as a former. This worked well so after scraping the bark off, I tied the frame in position to let it ‘set’ overnight.

 
Bending a green hazel rod around a former


Leaving the rod to 'set' in position
 
Otzi’s original back boards were larch wood (yet I’ve also read that they were elm) so just to be different, I made one from yew and the other from field maple. These back boards were split from round timber then carved into two thin planks. I drilled two holes in each end to provide secure lashing points, of course using a flint burin mounted into a hand drill spindle using rawhide lashing and pitch. This worked very well indeed! As I had every intention of using the pack frame I wanted to improve on the original by sealing the wooden parts with birch tar and using deer skin rawhide for really strong, durable lashings instead of the original plant fibre cordage. The rawhide lashings would be applied damp, shrinking as they dried gripping the work even tighter. My birch tar coating gave the wood a nice ‘antique’ effect and strong creosote smell which appealed to the eye but definitely not the nose (although it did keep the bugs away).
 
 
Using a flint burin to drill lashing points


Sealing the wood with birch tar
 
The shoulder straps were made from two 3” wide lengths of fallow buckskin, stitched around the frame with buckskin thonging and tied in place around the horns at the bottom end. I couldn’t help thinking the finished article looked similar to a snowshoe which, funnily enough is another theory as to it’s original use.
Lashing the backboards
 

Finished frame with buckskin straps
 
In use:
With pack frame finished and birch tar dry I got to work loading up the frame for a test run. In the absence of a goat skin bag I rolled up my standard day sack kit in a heavily smoked red deer hide and lashed it to the frame with cordage for a touch of authenticity. The frame felt extremely light and the fit was good. As the hazel rod still hadn’t seasoned fully, in theory the green wood frame would conform to the shape of my back during use. The buckskin straps had plenty of room for adjustment and enough spare end to take them from the bottom of the frame and around my waist, tying with a reef knot. This lifted the pack slightly placing it higher over my centre of gravity and taking some of the strain away from my shoulders and neck. I had just re-invented the rucksack waist belt and wondered if Otzi and his mates would have taken advantage of this unplanned bonus too. With the addition of some padding on the back boards this pack frame would not be too dissimilar to any of my modern packs for lightness and comfort!
Loaded up with belongings wrapped in a heavily smoked red deer hide
 
The burden basket:
At this point, all I had to compare Otzi’s pack frame with was my plethora of modern, traditional hiking rucksacks so in the interests of experimentation I decided to make a completely different load carrying system using sticks, skins and string, the burden basket.
Burden baskets have been used for centuries and still are the world over for carrying heavy loads. The conical shape is an extremely strong design and allows lightweight materials to be used in it’s construction. Typical carrying methods include shoulder straps or a ‘tump line’ (wide strap around the forehead or chest). They can even be fitted either side of a mule or similar beast for hauling a serious amount of gear. Some can be quite decorative, made up from coiled grasses and plant fibres while others are more rough and ready. I went for the rough and ready option, a rigid warp and flexible weft open weave design using green hazel rods and rawhide cordage. This model is apparently influenced by several different cultures from Mexico to Africa and with access to suitable materials, can be put together very quickly.
Before bending any hazel rods, I snipped my way through the remaining supply of fallow deer rawhide, cutting an ever decreasing spiral to create very long continuous lengths once soaked and stretched. With the rawhide lashing and weaving material soaking I carefully bent three similar sized green hazel rods around a former, then another two for spares, plus three hoops for the rigid wefts and left them to set in position. As with my Otzi pack frame, these had the bark scraped off and a coating of birch tar to seal the wood.  Once the hazel components were dry and the rawhide had become flexible again, the three ‘ribs’ were lashed in place to give six equal gaps between warps.
Cutting a spiral of rawhide

Lashing the three hazel hoops in position
 
The hoops were bound securely in place using rawhide lashings, starting near the base with the smallest and working up to the largest at the top giving the framework a natural flared opening. Soaked and stretched rawhide warps were taken from bottom to top and back again, spiralling around the hoops to tie each section more firmly in place. Lastly, a rawhide weft was started at the top and worked down to the base wrapping around rigid and flexible warps alike, creating a strong mesh. A buckskin tumpline was fitted and my second (and much prettier) pack frame was ready to trial.
Adding in a strengthening hoop
Fitting an intermediate hoop and strong rim
 
Rawhide warps
Rawhide wefts close up
 
In use:
Whilst being vastly differing designs, both packs required an additional weatherproof bag to contain small items of kit although the burden basket did not need any further lashings to accept the load. Everything sat inside nicely. The burden basket did exactly what it said on the tin, swallowing up a vast amount of heavy kit. I was amazed at how much kit it could take and impressed at the concept. Each of the individual components on their own were not particularly robust but when woven into a strong but flexible mesh their different qualities combined made a tough bit of kit. It could probably even be used as a fish trap with a bit of imagination!
 
Buckskin tumpline fitted although this is likely to be replaced/reinforced with shoulder straps
 
However, it’s certainly not that comfortable when you need to be nimble and light on your feet. This is where Otzi’s pack frame edges into pole position in my opinion. It’s still robust enough to carry your kit but won’t swing about as much or attempt to break your neck when ducking under branches and skipping over logs. My plan now is to oak bark tan a couple of nice thick fallow deer hides to make a roll top, leather sack for it, probably treated with a mixture of animal fat and birch tar to make a kind of primitive dry bag. So in summary, the burden basket is fantastic for lugging heavy loads but my Otzi pack will always be sitting on the top, holding all my essential kit ready to grab and go as soon as the heavy kit can be left behind.
All loaded up and taking it out for a spin. The high position is better for load carrying but a bit unstable with just the tumpline fitted. More traditional models are shaped more like a cone which seems to dovetail better with the tumpline strap and aid stability


Thursday 20 February 2014

The Winter Bushcraft Challenge


Bushcraft training and survival training are often thought of as two quite different creatures however, there is a point where the two merge and cross over. The Winter Bushcraft Challenge which took place at our Wiltshire woodland site last weekend, is definitely one of those hybrids. Designed as a testing 48 hour exercise, it aims to address some of the essential requirements for wilderness living from a bushcrafters perspective. Kit, clothing and food are deliberately limited at the coldest, wettest time of the year to truly test the participants understanding of survival priorities, their knowledge and their skill in implementing wilderness survival skills training.

Before signing up, participants must have an existing level of skill and knowledge, including a realistic awareness of survival strategy’s in the event of an unexpected be-nightment at the mercy of the elements. In a typical UK based emergency scenario such as this, the recommended course of action would be to seek immediate, safe shelter and do everything possible to conserve body heat, paying special attention to where and how this might be lost (conduction, convection...). Precious energy would need to be retained for keeping warm during the long night, possibly only invested in improving your shelter or making your position more visible to rescuers. Hopefully by hunkering down in this manner you would be alive, safe and well the following morning.
Utilising a fallen birch tree as a shelter framework
 
However, the Winter Bushcraft Challenge seeks to go further than short term wilderness survival and allows participants to fly in the face of logic, speculating to accumulate with a bit of hard graft, making their potentially miserable situation into a positively enjoyable one! Participants are encouraged to brave the elements, possibly putting themselves at greater risk and invest some of that precious energy to raise their survival chances considerably. It’s a double or quits strategy, even more so due to the fact that their clothing choice (each persons own little micro climate) is deliberately restricted to ye olde wool for inner layers, tight weave cotton for outer layers and one wool blanket per person. For these reasons, plus the colder time of year a warming campfire becomes a high priority in this fictitious scenario, where you would most likely be able to get by without one at other times of the year. The ability to light a fire in cold, wet conditions, under increased pressure, with only sparks as your ignition medium and no pre-prepared dry tinder, is an essential skill to develop.
  
 
Burning 'bony oak' for long lasting warmth through the night
 
Additional items on the limited kit list include a belt knife, small folding saw, a Swedish fire steel, one metal cooking pot, a wooden cup and a handful of safety gear (torch, whistle, phone, first aid kit). Participants are also given a small amount of wild game and rice to sustain them for the 24 hour duration. Even this relatively modest meal obviously requires cooking before eating, meaning that energy must be invested before energy can be obtained. Water too, is deliberately difficult to come by and must be boiled before drinking – a mean trick again designed to get participants thinking carefully about prioritising their survival needs. Almost every decision made in such testing conditions carries consequences and there will always be a trade-off. Any mistakes made only serve to enlighten the participants further, providing the kind of personal experience impossible to obtain from a book, demonstration or lecture.

 
A hot cup of pine, fir or spruce needle tea is just the job!
 

Let me stress once again, such a strategy would most likely be a gamble too far in many typical UK survival type scenarios and the kind of natural resources required to build shelter, light fire etc, unlikely to be immediately at hand on your average remote Scottish hillside. I would always encourage anyone venturing out into the wilder parts of this island and similar environments to carry a suitable lightweight shelter system (bothybag, bivi bag, tarp) as well as enough warm layers (blizzard bag, down jacket) and high energy food to help maintain core temperature during the long, winters night. See this suggested packing list for advice

This challenge is less about employing bushcraft skills in a realistic survival scenario and more about encouraging a feeling of self-reliance and total confidence in ones abilities, a heightened awareness of natural resources and less dependency on the reliability of carried survival kits. We’re also preparing for the extremes and the unexpected where a carried survival kit might not provide all the answers. What if it's so cold that just hunkering down won't be enough? What if your clothing and kit are soaked, damaged, inadequate, lost or possibly not even there in the first place? Having confidence in your abilities as well as personal experience to draw upon will ensure a more level head is maintained when sh** meets fan, rather than the onset of panic and a mental barrage of partially retained yet untested information. Your situation may not be exactly the same as this self -imposed practice run but you'll have raised your chances considerably. You’ll know what's possible and what would be dangerous to attempt. Ultimately, you’ll know exactly what you're personally capable of!


Imaginary survival situation aside, your desire to learn bushcraft might stem from an interest in natural history or experimental archaeology. You might have no real interest in survival techniques at all. Reducing kit to a minimum for a challenge such as this puts more emphasis on traditional wilderness living skills, adding meat to their bones and giving them real meaning.

Rear view of a lean to shelter showing the thickness of thatch required to keep the winter weather at bay
 
Don't forget the insulation between you and the cold earth. Here, Doug fir boughs make a perfect mattress
 
Your interest in bushcraft might just be about shedding the confusing clutter of modern life, lightening your mental load, regaining control over your life. The knowledge that you can provide everything you need with your own two hands, hard work and grim determination is unbelievably empowering…even if it is only for a weekend!


You might just enjoy the adventure…

Whatever the reason for learning bushcraft, I like to think of challenges such as these, as a final part of the jigsaw.
 

The Winter Bushcraft Challenge will run again in 2015…but you better be ready! Preparation should include knowledge of building natural shelters, beds, bindings and cordage, well-practiced wet weather fire lighting skills, experience in preparing and cooking various types of wild game, water purification techniques, a good knowledge of wild plants, trees and their uses as well as an honest, hearty helping of just getting out there and doing it!

For everything you need to know, look here


Sunday 5 January 2014

A Week in the Wilds part 3: Bush Crafts

A Week in the Wilds part 3...the story continues...


With the Hunter Gatherer challenge week already taking bookings for October 2014 I thought I should get back on here and conclude the story of my own experiences whilst taking part in the course during the autumn of 2012. Part one gave an outline of the challenge, what would be required, the tools and equipment we took and explained my own strategy in achieving the basic essentials for survival outdoors, most of which needed to be completed on the first day! Part two took a detailed look at my strategy for gathering, processing, cooking and storing enough wild food to keep me topped up on energy for the week.
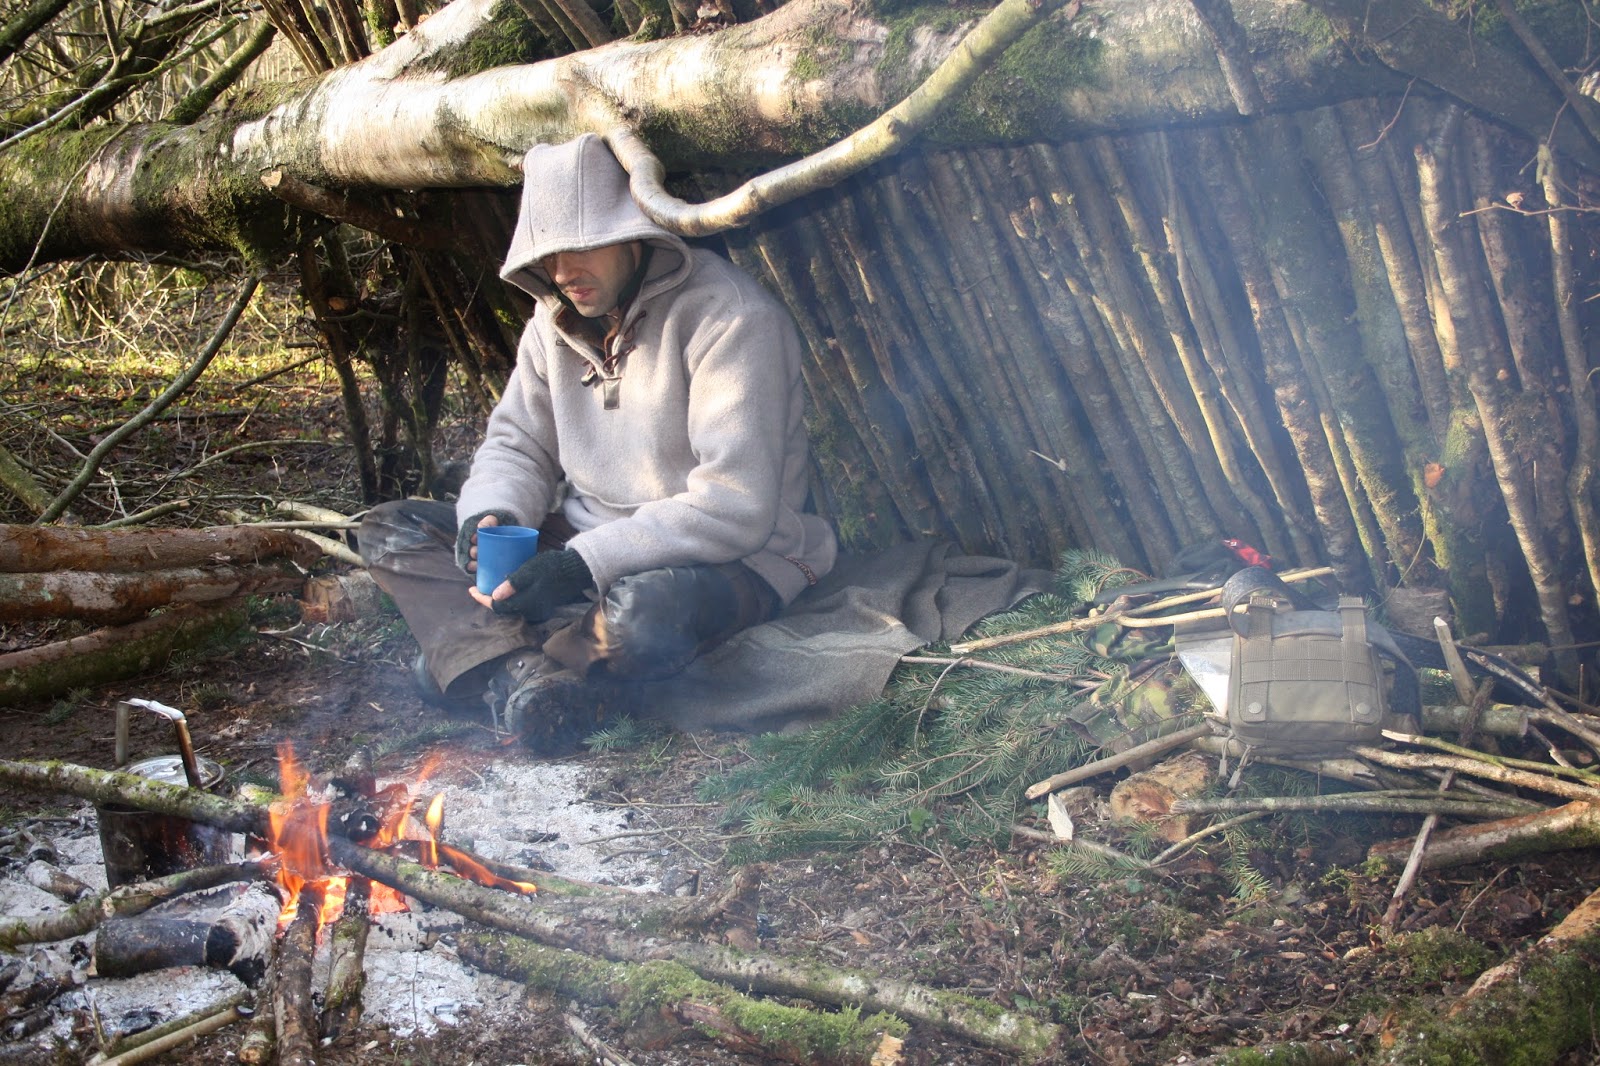
During this third instalment I’ll explain the true purpose behind the challenge. Although we were using our bushcraft training to help us locate, gather, process and construct almost everything we needed to help us survive for a week in a wood, the aim of the game was to go beyond just scratching together an existence and delve deeper into improving our situation. Looking to the long term rather than just waiting to be rescued from our self-imposed imaginary survival situation. Once the basics for life had been achieved and food had been gathered we would be looking for ways to become more effective hunters and gatherers, ways of making our homes more comfortable, ways of making our lives more energy efficient. For someone with a lifelong interest in the subject and an ever expanding interest in traditional crafts and ancient life skills this was an exciting prospect…however, you can only hope to achieve so much in a week (my ‘to do’ list had me down as inventing the internet by the Friday and getting everyone else to do my hunting and gathering). This was going to be an exercise in testing bush crafts skill rather than survival.
By entering into the challenge, fully appreciating the true aim I was able to be constantly mindful of the need for certain resources in the very near future, even though other needs ranked higher at that particular moment. In previous posts I have explained that whilst a metal cooking pot turned out to be one of the most essential items of equipment you can have in a situation such as ours was, having only one pot in the kitchen proved to be fairly limiting. Every drop of water gathered needed to be boiled before drinking and survival stew was pretty much the only meal on the menu most days. So, while gathering my first billy of water from the stream, future resource number one was noted…clay. Our wild meat ration came in it’s natural packaging so again, future resources such as hide, sinews and bones were removed and squirreled away. Certain trees were added to the mental resources map if they looked useful for resin, carving wood or cordage. My foraged plants often had non edible parts that could be put to good use such as the easily weaved cattail leaves or the huge leaves of the burdock. If a resource was small enough to be gathered and bought home whilst looking for firewood and food, then it was. Soon my camp began to look like a hoarders paradise, an Aladdin’s cave of crap fit for the compost.

A cattail leaf food preparation mat made by Guy

My first priority, however, was to repay the wild meat loan. The deal here was that all participants started the challenge with a certain amount of wild meat (their only food for the week). The reasons for this marry up nicely with the aforementioned long term survival theme of the challenge and are explained in part 1. To retrospectively ‘earn’ the wild meat we had agreed to meet up on day three with a primitive projectile hunting weapon made by our own fair hands and using only the limited tools and equipment we carried along with any natural resources we could gather. Not only that, but it had to be capable of hitting a target from a suitably realistic hunting distance. We were fully aware that many other factors would come into play if we really did have to hunt wild game with our home made efforts (including a hefty fine or prison sentence in the UK) but given the nature of the challenge, we felt that making an effective weapon and successfully hitting the target would be a perfectly acceptable compromise.
So, I needed a projectile weapon capable of taking down a small deer. Not only that but I had nothing but a small knife and folding saw to make it with, limited time, lower energy levels and limited skill in successfully hitting targets with some of the more basic primitive weapon options. I’ve taken many a rabbit, squirrel or wild fowl with nothing more than a well thrown stick and a hasty follow up in the past but knew that to justify my fortuitous protein head start I’d need something with greater accuracy and packing more of a punch than just wellying a log through the woods. Knowing that a spear would require a lucky encounter or a long ambush and my atlatl throwing skills were about as predictable as the British weather I decided that the only realistic option for reliability and accuracy would be a bow and arrow.
 

Hazel rods stripped of their bark

I’ve made bows before but here, faced a few potential hurdles. Firstly, to make something with a fair bit of power, that could be used over and over in practice would require a seasoned stave of a suitable and readily available wood such as ash. To split out a stave and then remove enough wood to tiller the bow with only a small knife would not be impossible, but would take more time and energy than I was prepared to spare. I had made various ‘survival bows’ in the past too including a bamboo cane ‘bundle bow’ (bound bundle of canes, various lengths with all the bulk in the centre, tapering off towards the end of each limb). These proved to be extremely effective and quick to make…but I didn’t have any bamboo. By way of experimentation and the potential to look a real smart arse if it worked, I decided to use the bundle bow principle with a material I was familiar with, hazel rods. Hazel rods could be easily harvested with knife or saw and very quickly bound in the same fashion as a bamboo bundle bow.
Hazel rods bound with rawhide
 

The binding material needed to have good tensile strength to hold everything tightly in place while being stretched back and forth. Gaffa tape provides the perfect solution if you have your survival kit but the best option available to me was rawhide strips taken from my RPG blasted muntjac deer. As the hide was not in the best condition and I was keen to use parts of it for other projects later in the week, I took just enough for my needs, cut it into strips and left it soaking in a muddy puddle along with some hard wood ash from the fire to help loosen the hair. To be honest, the hair was already coming out by the time I began making my bow and if push came to shove, leaving the hair on wouldn’t have really made a lot of difference to the materials for this task.
The finished bundle bow with paracord bow string
 

As the bow was to be used in quite close cover, I decided on a short but hopefully powerful model. This was to be mistake number one (but I didn’t realise yet). A shorter bow would be less cumbersome to sneak around with in the woods and easier to use from dense cover. The theory was that I should be able to stalk closer to the deer in woodlands too meaning that the range of a longer bow wouldn’t be so important. A shorter bow also meant less lashings leaving more hide for other tasks. I cut several likely looking hazel rods, stripped the bark with the back of my knife and arranged them in size order. Bundling them together and lashing them tightly with the stretched and slightly damp rawhide, I gave the clumsy looking bow a tentative floor tiller. It creaked and complained a bit but felt extremely robust and springy! I re-positioned and straightened the rods, re-tightened the rawhide as best as I could and hoisted the bow up in the smoke and ambient heat from my campfire to dry out overnight. Now redundant, the paracord from my bow drill set looked like the best choice for a bow string so I tied a loop in one end and fixed it to one limb of the bundle bow ready for action.
Next, the arrow...
For the arrow, I used another thinner hazel rod cleaned of it’s bark and scraped to a more even diameter along it’s length. Any bends and crooked sections were heated over the fire, then held just beyond the straight until the wood cooled. Finally, I scraped the wooden shaft with a sharp flint edge and using my folding saw, carefully cut opposing notches at either end for the arrow head and string nock. The fletchings came from one wing of an unfortunate wood pigeon who had become lunch for a fox by the looks of things. I carefully trimmed these to sit tightly against the arrow shaft and bound them in place with sinew. I used back strap sinew taken from the muntjac deer as it needed very little preparation and was pretty much good to go after being dried, smoked and re-dampened.
 

Close up of pigeon wing fletchings tied with sinew
 

The scraped and dried muntjac back strap sinew
 
For the head I made a very simple flint point by basically smashing the hell out of a small nodule and sorting through the shards until I found something roughly around the right size and shape. This was coaxed into a slightly more recognisable arrow head with a few carefully placed taps from a pebble sized, slim hammer stone. Earlier in the day I had gathered some pine resin leaking from a bark scar and this was softened by the fire on a hot rock then mixed with finely powdered charcoal to add strength. Using this make shift hot melt glue I fixed the arrow head to the shaft, additionally binding the fixing with sinew then covering the whole caboodle with more resin. It must be said that after the frantic first couple of days building my temporary home in the woods and laying on all the services, the whole bow and arrow making episode felt like a huge and obvious transition from one stage to the next. In fact, lying on my home made mattress, surrounded by darkness and hooting owls, survival stew bubbling away, working next to the light of the fire I couldn’t remember a time when I felt more contented out in the woods.

 
The day of reckoning arrived! I’d put together a ‘range’ where we would all meet and now here we were brandishing several dangerous looking weapons including spears, dutch arrows, darts, throwing sticks and a couple of bows. After several days living wild in the woods we all looked (and smelt) like the theoretical animals we would be hunting. Having previously discounted spears and throwing sticks, in the right hands they were looking decidedly lethal and making a mess of my target board!

 
"Get to the chopperrrrr..."
 

My hazel bundle bow worked ok, hitting the target where it needed to but would’ve benefitted from a few evolutionary tweaks. I used green rods which meant that the bow wasn’t as ‘snappy’ as it could’ve been (but there’s a very fine line between gathering seasoned hazel rods and gathering kindling). Also, for next time I would increase the length of the bow for more draw weight and power as well as making the lightest arrow I could get away with. I know this because Dave (the android) had managed to rustle up an ash self-bow with some very thin hazel arrows and a thinner bow string made from inner paracord fibres. His super light arrows and springier bow combo was the Usain Bolt to my Bella Emberg. I mumbled some stuff about my heavier arrow causing more haemorrhaging but we all knew whose bow had bought home the bacon. A lesson learnt…don’t try to be a smart arse!


Dinner!
 
Lessons learnt, I sloped back off to my den in the woods to try my hand at a bit of wild pottery. The water level down at the stream was much lower than usual and as a result, a good amount of clean and useable clay was clearly visible and easily gathered. I hauled back as much as I could, also hunting down an old house brick from a foresters bonfire to use as a temper and a hefty hammer stone to crush it up with. I hadn’t had a great deal of success with previous pottery experiments but knew this was mostly to do with the fact that I often tried to squeeze these experiments into a ridiculously tight time schedule. You can’t rush something like primitive pottery, but here I had time to do a better job. So I worked the clay in my hands as much as possible, clearing out any obvious, potentially problematic pieces of debris as I went. With my clay cleaned as well as it could be in the circumstances I wrapped the burnt house brick up in a t shirt and bashed it to smithereens with the hammer stone until it was reduced to a fine red powder. Thinking of Dave and his stupid bow really helped here (only joking Dave).

Stream bank clay with burnt, crushed house brick temper


This was worked into the damp clay at a ratio that seemed about right. I pushed, pulled, prodded and pinched the ball into a sort of shallow bowl, dish kind of thing trying to get it as smooth and as even as possible even at this early stage. It was then hidden away to begin drying out in the driest part of my shelter, not too near the heat from the fire. As soon as the clay felt like it was firming up I took a sharp slither of stone and began scraping and smoothing the inside and out to an even thickness, filling any tiny cracks that appeared with the slurry I had created by scraping. The happier I became with the bowls progress, the more trepidation I felt about firing it. Previous firings had resulted in some disappointing but dramatic mini explosions.


I let the bowl dry some more then carefully etched a pattern around the rim as decoration (trying to be a smart arse again..). Now, feeling dry to the touch the bowl found a new, warmer home just inside the stacked log wall surrounding my fire place. I knew that despite feeling dry, it would only take a few drops of water to revert this bowl, dish thing into wet clay once more so firing was the only answer…but not too soon. My plan was to gradually move the bowl closer to the fire over a period of days, finally allowing the fire to claim it for a proper, fierce firing right in the heart of the coals and flames on the final day. In fact, I went home with the bowl dry but not yet fired. The firing happened whilst running a course a short while later (I think we were heating up rocks for an underground hangi oven or something). As you can see, despite a few authentic looking cracks, none of them life threatening, it survived the process! There’s certainly room for improvement but it’s a good step forward.

 
As the days ticked on we all found time to work on different crafts in addition to feeding ourselves, staying warm and sheltered. We whittled pot hangers, spoons and other treen, wove brambles into baskets and leaves into food preparation mats. Myself and Guy had some buckskin pouches to put together  (admittedly these were made using our own previously prepared buckskin we’d bought along but at least we had the spare time).

Various crafted items: bramble stem foraging basket, clay bowls, carved spoons, venison jerky, a roughed out kuksa cup and buckskin pouch
 
Guys buckskin pouch with bone toggles

Once we’d fought through the first couple of days and established a routine we seemed to have quite a bit of spare time, however I’m under no illusion that, for the purposes of this exercise I had chosen a location with plenty of accessible wild foods growing nearby. Also, we were just entering a time of year when, not only was it still pretty warm but in wild food terms it was certainly a time of plenty. Additionally, we were all in good health and only there for a week so this personal experiment cannot be considered a realistic example of how bushcraft training can help a modern human successfully revert back to hunter gatherer status. Everything is relative though and I still maintain that without the skills we had spent years honing, our week living wild would’ve been over in the first 24 hours …. and even if we had managed to stay alive, we certainly wouldn’t have been as comfortable!


If you fancy trying your hand at the Hunter Gatherer Challenge in October 2014, get in touch to discuss pre-course preparation or visit the website page here
We're also running a Winter Bushcraft Challenge in February which is designed as a perfect warm up (probably not the best choice of phrase) for those who have the intention of attending the Hunter Gatherer later in the year.
Thanks for reading. Hope you enjoyed it!